TenkaraPath Blog
  • ON THE PATH
  • CONTACT
  • TENKARA AS PRACTICE
  • TENKARA PATH STORE
  • ON THE PATH
  • CONTACT
  • TENKARA AS PRACTICE
  • TENKARA PATH STORE

Managing your gear like a minimalist Part TWO

1/17/2016

1 Comment

 
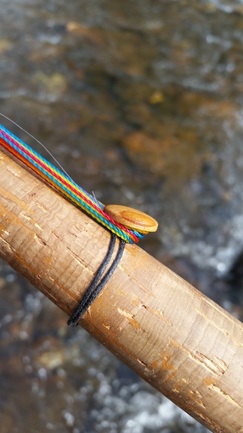
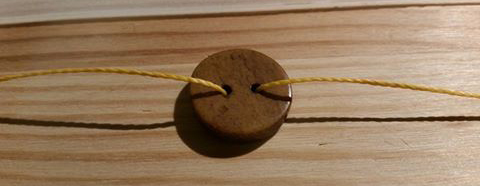
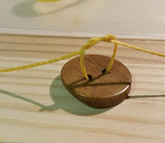
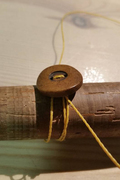
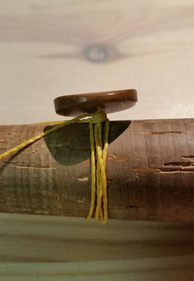
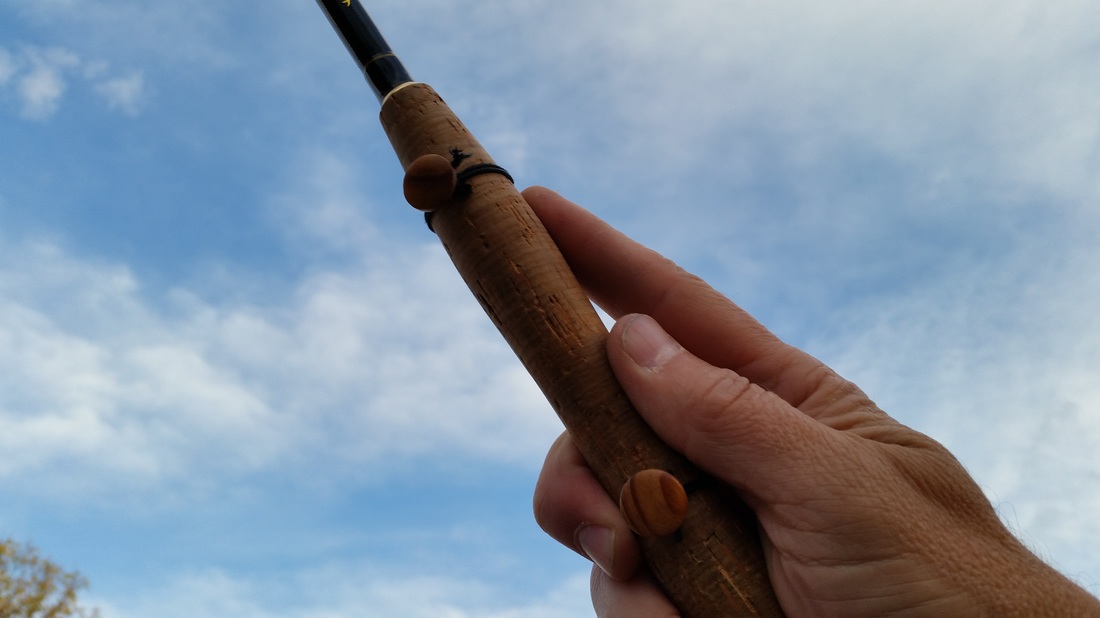
Last week in part ONE we covered a scope of line management and spool options This week we look primarily at just a couple of ways of attaching your line directly onto your rod.
       
Its about being able to move quickly from one place to another.
One thing that I found troublesome on the stream is managing line while moving from one place to the next.  You know, when you have to break your rod down so that you can get past a bunch of brush and move to the next hole? I've wrapped the line in my hand and around the handle of the rod too. For these short cuts I've been rewarded with nice knots in my leader and frustrating time not fishing while I tried to undo my mess. 

Line tenders are not reels.
Just because Tenkara is without a reel doesn't mean we don't need to have a place to put line when we aren't using it.  Sure some of the spools I shared last week would work just fine.  They are reasonable solutions to the issue.  One thing to consider with some of those ideas is that they aren't always the fastest way to manage a line when you are just jumping up or down stream a short distance. You have to find the spool wrap the line and break down your rod. When you get to that next hole you end up going through the whole process again of unwinding from a spool and putting the spool back into your pocket. This is not a huge deal but... I don't  know how many times I've dropped that spool into the stream and had to chase madly after it. The obvious answer to this is a rod mounted line tender.

Rod mounted line tenders

My good friend Jason Klass wrote about creating these some time back on his blog TenkaraTalk. Someone else came up with the same idea and commercialized them.  (I believe personally that Jason was the historic inventor but I am a biased friend.) These clips attach to your rod and you wind your line around the two points. They are held on by elastic or silicon bands. These are probably the most practical item you can add to your tenkara rod. However the commercial ones in my opinion are overpriced for what they are. I have been experimenting with some variations on this idea.
Moldable plastic polymers and synthetic modeling clays.
I’ve experimented with a few different materials and found that with time I could probably fashion my own very workable rod mounted holders. I played specifically with a very easy to mold and even remold polymer. Instamorph. It gets soft in boiling water and can even be re-melted if you screw up.  The polymer cools and hardens quickly so you do have to work somewhat quickly. The remoldable nature of this product makes it easy to use over and over again until you get the hang of it. Once you get a basic shape that is close then you can file, sand or cut the pieces into shape. 
Plasticine Clays
Another option is found at your craft store. Ask for "FIMO" and the clerk will take you to a rainbow of colorful clays. They come in small blocks that seem slightly expensive for what they are but you will only be using a little of the stuff. You can mold your clips with this material and then using your conventional oven bake them into solids. I have played with FIMO or “Plasticine” in the past. It is very durable.  The one issue with these moldable mediums is the tedium and time requirement to make clips from them. There are much faster solutions. But if you are into making stuff it's also a great afternoon project. You bake this clay in your household over to harden.
Picture
Picture
Sugru
This was covered very well by Jason on TenkaraTalk blog last June. I haven't had a chance to play with the stuff myself but will likely give it a run sometime in the near future. Here is what Jason said about it.  I think it may even be a better material than the moldable plastic polymer I mentioned above. I'm not fond of the idea of using it directly on my rod as a glued to the rod kind of holder. But I could make a clip that can be attached with cording or black gaskets.

Whittle your own
Look for interesting found wood on the stream banks. You may want to take a break from fishing and whittle a little on some well washed pieces of river wood. You can carve your own clips. Look at the commercial clips as a starting point for your found wood clips. Attach them with the same cording above. You will have the pride of making something very unique. Its takes a little grandpa ingenuity sometimes to come up with a very rustic and practical line tender clip but you can do it.
Picture
Picture
Buttons, Buttons and More Buttons!
This is the best cheap and practical hack for line keepers out there. While I didn't come up with myself I have certainly taken it to a slightly new place sharing it here.  It has become my chosen method at this time.  All of my rods now have them. 

Go to the button section of your local fabric store and start looking at all the buttons that are there. Yes you are going to see a lot of garish things that you would never want to attach to your rod. Ignore those. You are going to need two buttons not bigger than ¾ of an inch in size but not smaller than 5/8 of an inch in diameter. Look for the ones that will look good on your rod and that will not interfere with the function.

Think of it as"tricking out your rod" a little. Think about how the buttons are going to look on your rod and explore the different button materials. Beyond Plastic there are ornate carved buttons as well as bone, and metal.  Some buttons have two holes, some have four, and some have no holes that go through but rather have a shank loop on the back of them. We will talk about both shortly.

Once you have picked out a few buttons buy more sets than you think you will need. Better to have a few spares and an extra set or two to add to your other rods. Some buttons can run as much as 6 dollars each. Go there if you love the buttons but that is probably too much.  I think the most I paid was about $1.25 a button.

Depending on the style of button you will have to work out the best way to attach the button to your rod.  The commercial clips attach to the first section of the rod shaft. I am not a fan of this placement and found that attaching to the handle was a better and more secure place. Add to that I own a Tenkara USA SATO which has telescoping lengths and is impractical to attach to the sections. BUT you can attach to the cork handle just fine.
Picture
Picture
Picture
Picture
Attaching the buttons
Depending on the kind of button you get you can attach these in a few different ways. Elastic bands work but will not be a long term answer as latex elastic degrades in sunlight. I found that there are a variety of nice waxed beading cords that hold well to the rod. You will find these in the beading section at your local craft store. Just look for cording that has a little grip to it. There are natural as well as synthetic sinews available that will also work. I have settled on the very affordable waxed beading cord. It comes in a few different colors and work really well.

Easy attachment
string the button midway on a 15-20” length of waxed cording and tie a knot on the backside of the button. This holds the button in place at the center of the cording so it won't slide on you. you can tie two knots if you want to build up a little more security. This knot is also important because it becomes the "post" that your line wraps around later.

Button Placement
Position the first button near the top of the handle of your rod. Wrap each of the ends of the cord in opposite directions around the handle of the rod. They will wrap firmly around the corking. There is no need to cinch these down to the point that you are denting the cork or foam handle. Once you have wrapped each line 2-3 times around the handle then you want to wrap the line in the space between the button and the handle. Remember that knot you made earlier? This acts as a post to wrap the line around a couple times. Again each end of the cord goes around an opposite direction from the other. The last step is to tie those two ends with simple overhand knots that crimp down onto the knot post.  Trim any excess cording and repeat the step for the second button.  The second button should be attached about 4-5 inches lower down the handle than the first one.


How does this affect your rod?
I wondered the same thing when I put these on and found that the handle was actually a much better place to put the buttons. The overall weight of the button line tender is very negligible.  If the buttons seem in your way you can turn the rod so that they are on the bottom side of the handle as you hold the rod for casting.  I don't even notice they are there really until I need them.
Picture

There certainly are more ideas out there for mounting different kinds of line managers to your rod. Please share your ideas in the comment section below. 

In the next and final installment of this post I will talk about some fly box and fly management solutions. After that I hope to share some other topics. I am sure I will be back to more of these ideas too.
1 Comment
Carl
6/23/2021 05:27:58 am

I am very interested in the type of tenkara line you use? The photo showing your buttons line holder. The line in the photo appears to be a braided, multi-color line. Can you please tell me more about it? I am always on the look out for different material, or different lines to use for a tenkara rod. Is it just a braided fishing line made from PE material, that you can purchase off of Amazon, or E-bay? What lb. test is the line you use? Thank you very much!

Reply


Leave a Reply.

    Picture
    Picture

    Dennis
    Vander Houwen

    Dennis lives in Colorado with his super supportive wife, talented artist son, a smart older dog, a 2 yr old river buddy dog, and a very lucky cat. 

    Dennis is an avid minimalist, wood craftsman, curious tinkerer,  student of life, and notably a deeply focused tenkara angler.

    Tenkara is a form of Japanese fly fishing that contains many lessons in its form, practice and history.

    This blog talks about embracing the simplicity of tenkara as a tool and example to enrich and inform your life.

    Always looking for great tenkara content. New and older article, video or  even helpful tips.
    SHARE HERE

    Quick jump to features

    TIE THIS!
    PATH NOTES
    TENKARA AS PRACTICE
    FEATURED ANGLER
    TENKARA SHOP NEWS

    Explore the Archives

    February 2023
    January 2023
    July 2022
    April 2022
    February 2022
    January 2022
    July 2021
    May 2021
    April 2021
    March 2021
    February 2021
    December 2020
    October 2020
    August 2020
    June 2020
    May 2020
    April 2020
    January 2020
    August 2019
    June 2019
    March 2019
    November 2018
    October 2018
    July 2018
    May 2018
    March 2018
    February 2018
    January 2018
    October 2017
    September 2017
    July 2017
    February 2017
    October 2016
    June 2016
    March 2016
    February 2016
    January 2016
    October 2015
    July 2015
    June 2015
    May 2015
    March 2015
    January 2015
    December 2014
    November 2014
    August 2014
    May 2014
    February 2014
    June 2013
    May 2013
    April 2013

    Categories

    All
    DIY
    Mindful
    Small Streams
    Tenkara Rod Cap
    Tenkara Simple
    Wyoming Tenkara

Proudly powered by Weebly