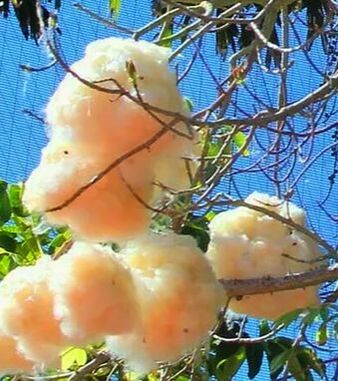
 Recently a material I was familiar with from my years in meditation, a cotton like fluffy cloud of natural fibers showed up in my news feed. I knew kapok was the stuffing I have been sitting on inside my meditation cushion. So when I saw it was being sold as a dubbing material, I was surprised. But the more I read about this fluffy cotton-like material, the more impressed I became. I must mention that I saw this material in my news feed being offered by the company Semperfly. I learned in my research that kapok is difficult to dye with any consistency. With some tolerances in consistency, Semperfly had come close to breaking the code and was now offering a nice palate of dyed dubbing in "kapok." Check your local fly shop and I bet you will find some. Being the DIY guy I am, I started looking for kapok in fabric and hobby stores with no luck. Frankly, most young fabric store clerks will not likely know what it is. It wasn't until I mentioned to my wife, who does fiber arts and sewing, to keep an eye out for some. "Just a second she says". Then brings me a large plastic bag packed with the stuff. A whole pound of it! What is Kapok? Kapok is a natural fiber that comes from the seed hairs of the kapok tree (Ceiba pentandra), also known as the silk-cotton tree or Java cotton tree. The kapok tree is native to tropical rain-forests in Central and South America, Africa, and Southeast Asia. It is a large deciduous tree that can reach heights of up to 230 feet. (70 meters) Kapok is an all natrual fiber that is light, buoyant, and has a cotton-like texture. Kapok has been traditionally used for various purposes due to its unique qualities:
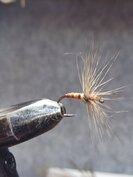
 I took a sample from the giant bag to share with my buddy, Jason Klass. He too was curious about the kapok and had just gotten some in the mail. He was blown away by how well it dubbed. Later he sent me a photo of a fly he was tying and using the kapok for. He cleverly used a sharpie marker to dye some of the kapok I gave him. He sent me picture of the hook on his vise. I have since also tried this out myself with some sharpies and other similar permanent markers. There are a lot of color options beyond the general offerings of Sharpie black, red, and blue. Having an artistic family we have a large palate to choose from. A few issues that must be mentioned though with this technique is that the pen color you use does matter if you want to have a "natural" or "appealing color", but maybe you are into those wilder neon colors... I won't judge. You also have to be careful in applying the color to the kapok. Take a little time to let it dry fairly well before wrapping it onto the hook. This is specifically true if you have any other material on the hook ahead of the dubbing that you don't want to have spoiled by bleeding ink. Using kapok as a dubbing material is really exciting to me. I love finding a new material that are all natural and that can be used for fly tying. Kapok really is a material that we all should have known about sooner. I feel a little foolish knowing that the meditation cushion I have been using is stuffed with it. I have been literally sitting on Kapok for years. I plan on trying to dye some in a few different ways. The sharpie though sounds like the most practical way to me so far. You can find kapok yourself on line in a variety of places. I hope that you get as excited as I am about this material for your dry flies. As spring teases me I am looking forward to tying up a bunch so that I will have plenty to use when the ice melts and the streams open up again.
0 Comments
In Brent's Words
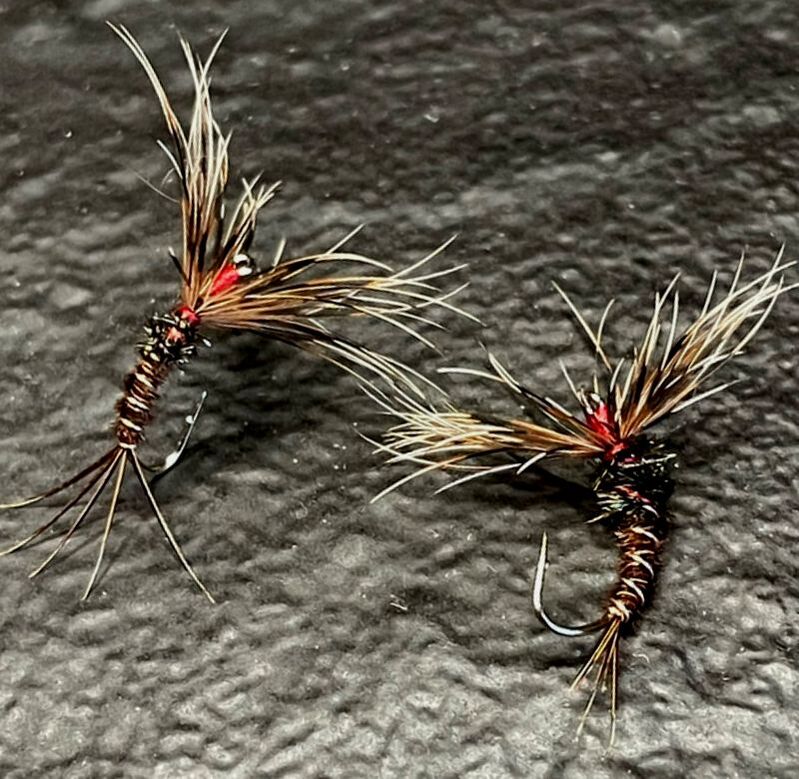
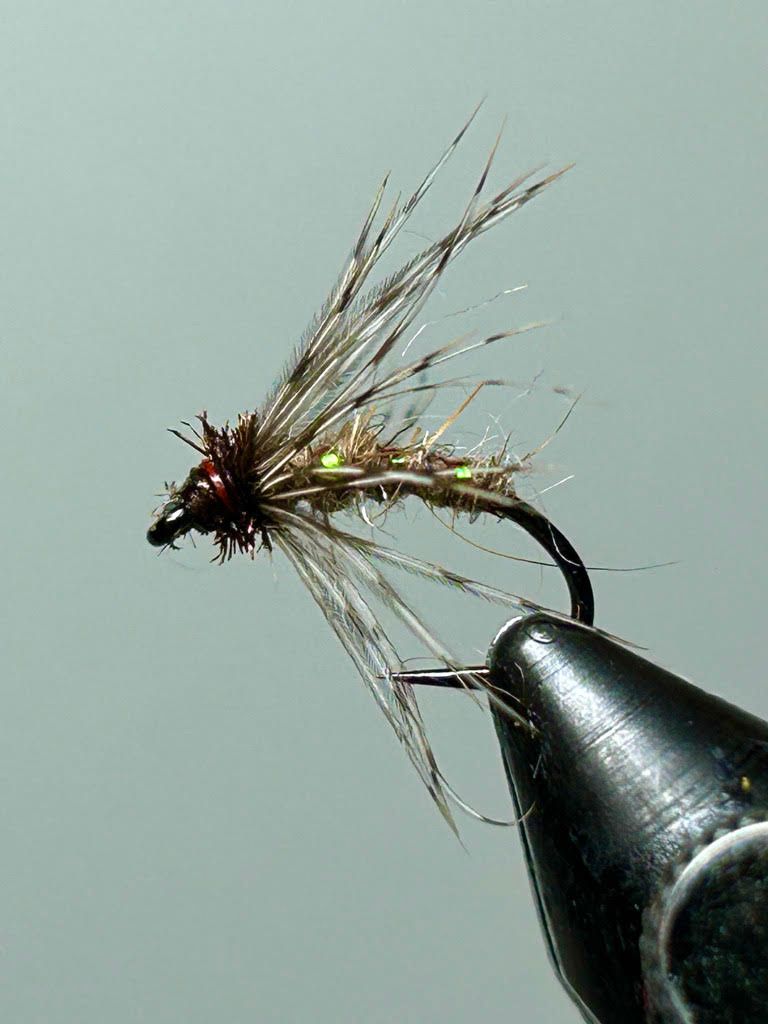
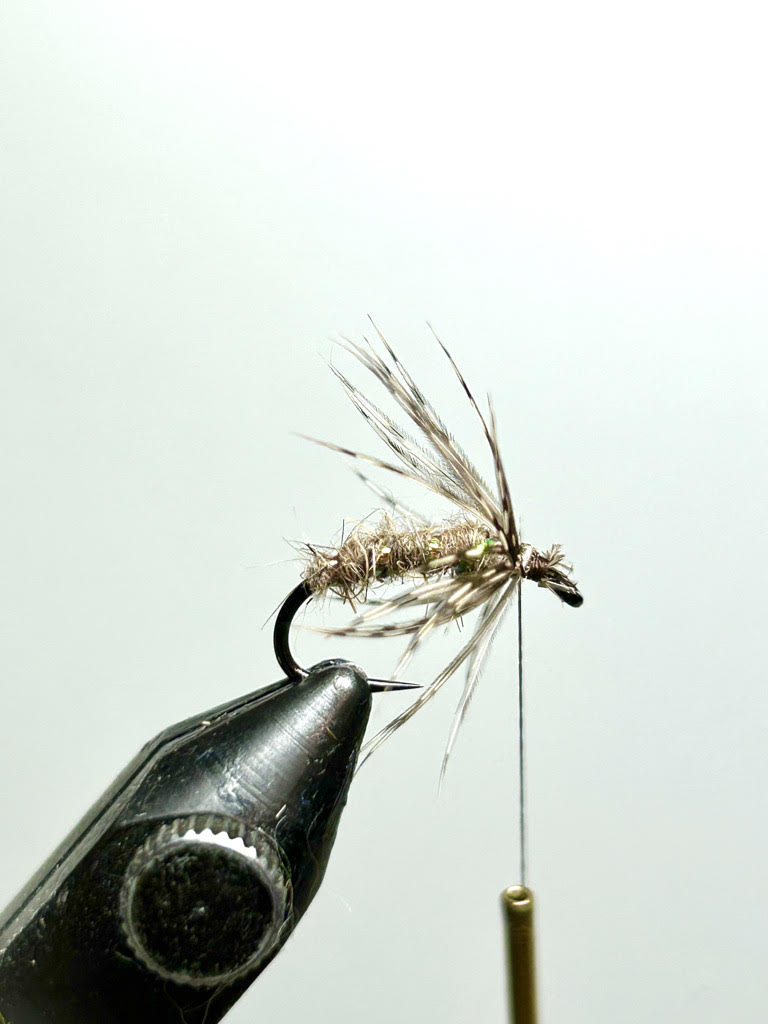
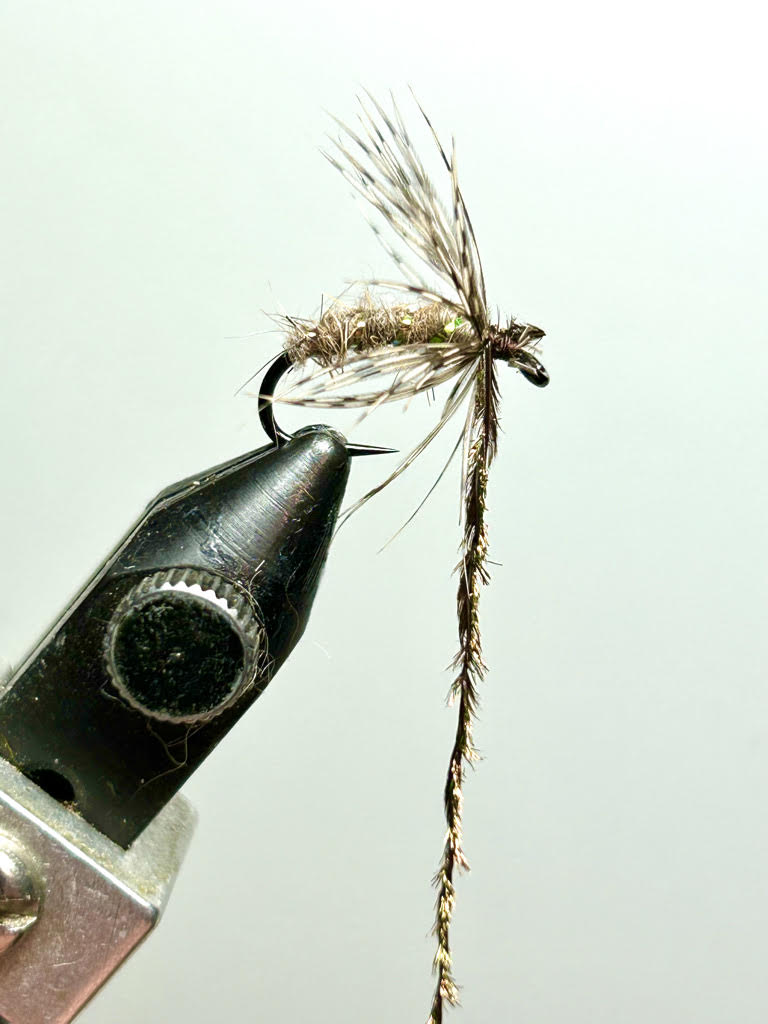
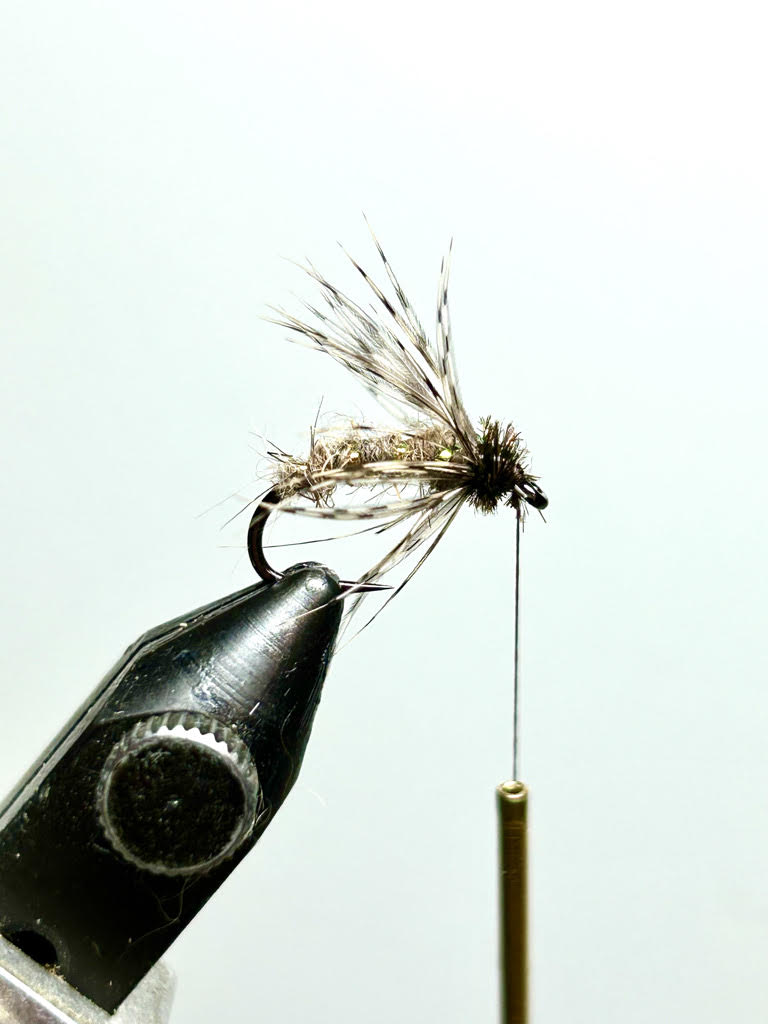
"I can't claim being the creator of the Royal Wolf Kebari as I have seen it tied once or twice in social media posts in the past but there is nothing I can find referenced online. The back body is based off a traditional Royal Wolf fly but the rest of the fly is just a sakasa kebari. I have seen some flies out of Japan that have this similar segmentation with peacock in the body as well so the idea is not new to tenkara but maybe to American tenkara anglers. It has become go to fly for me about 4 years ago for the fall season in small creeks, especially for brook trout. I was striking out big time with my regular go to kebari and I switched to this red kebari and the day totally changed. There seems to be something magical about a red body with the incorporation of peacock at the thorax and tail end of the body, it always works for me in the fall especially since that day. It works times of the year as well. It is a fun simple tie and the added peacock gives you a slightly different profile to present to fish when the traditional simple sakasa is not triggering the fish. "
How to Fish This Fly
This is a simple effective soft hackle tenkara fly that should work good especially for trout in mountain creeks & streams. This fly is meant to be fished as a wet fly (sub-surface) Thanks Brent for sharing this pattern with us. Be sure to check out DragonTail Tenkara And if you liked the video, you can see more wonderful videos as well at theirYouTube Channel
The fly is a great impressionistic pattern that can represent a variety of aquatic life at various stages of the life cycle. Because this pattern is generic I feel its fits very well into the tenkara realm as it can be fished nearly anywhere in the water column and is effective using a cross section of techniques such as dead drift, pause and retrieve, tapping, lift and drop, down across swing, and by simply changing rod position you can move the fly into various levels within the water column. This variation is my attempt to add in a bit of flash and light to the traditional pattern to increase attraction and feeding response.
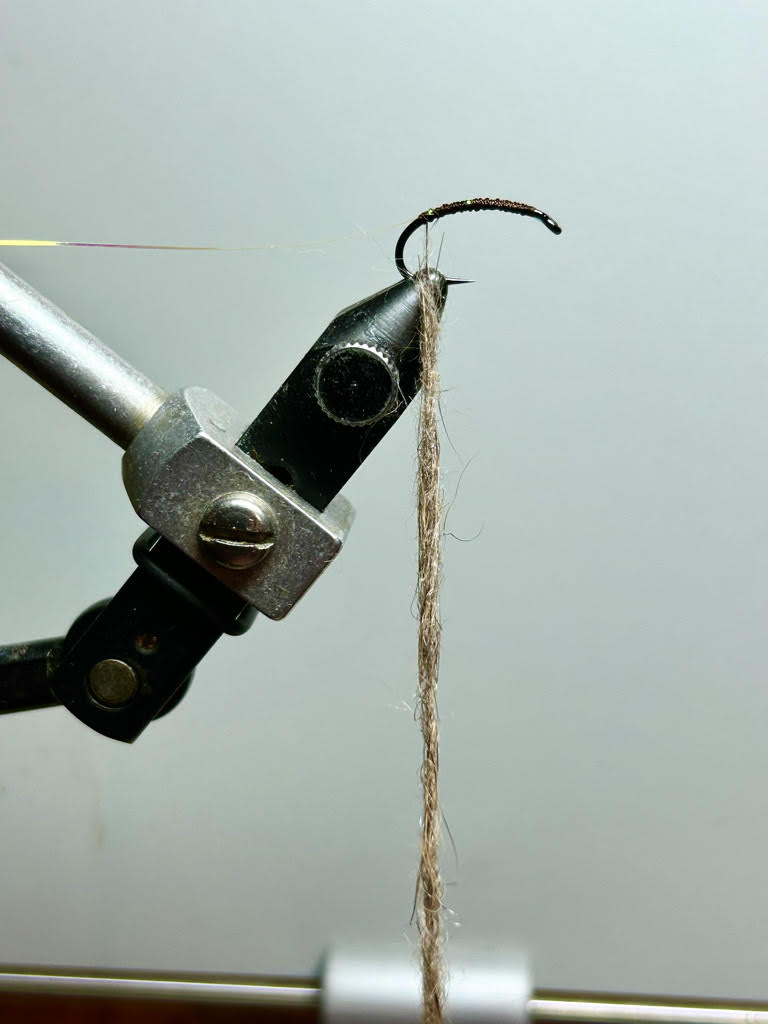
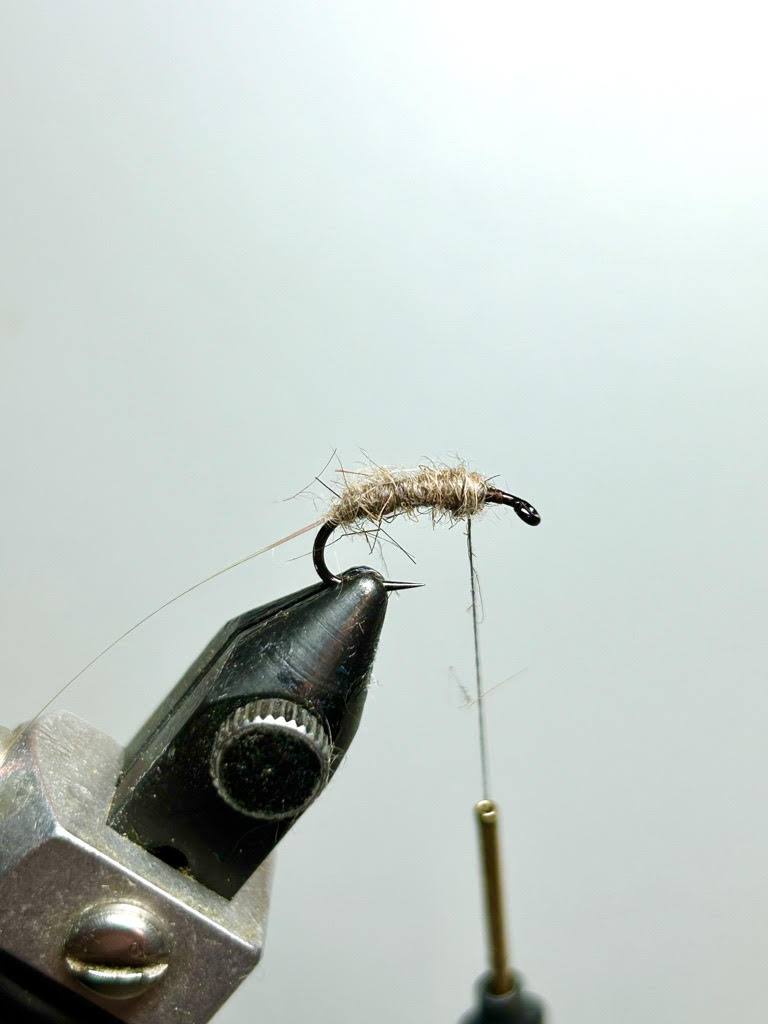
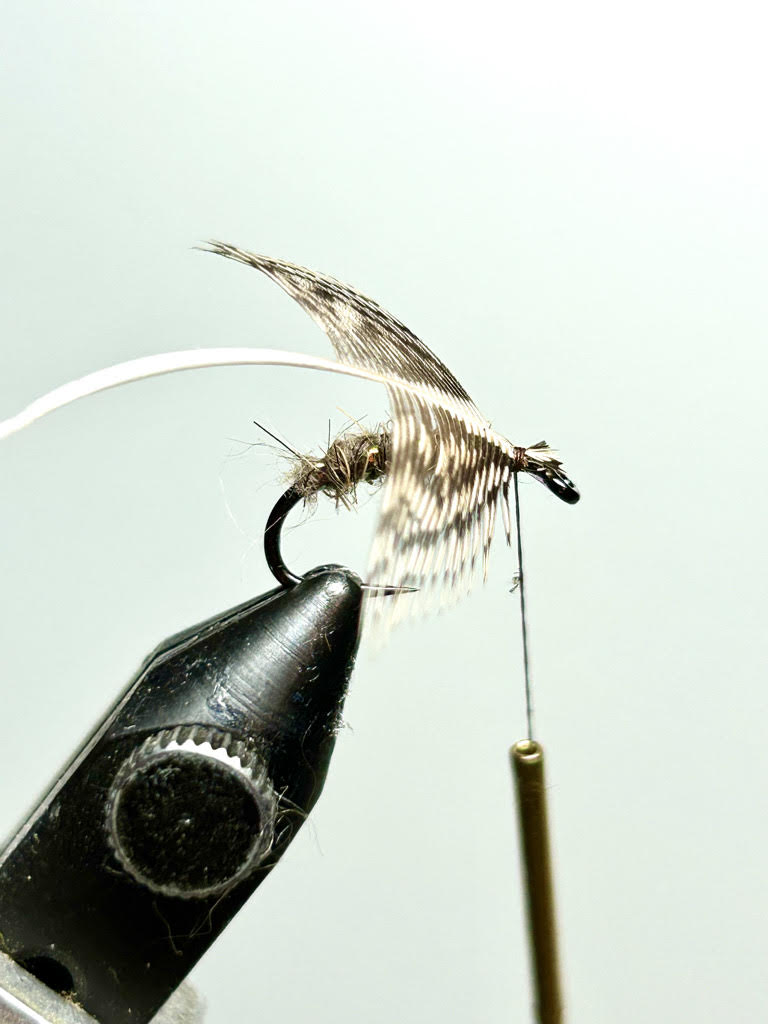
Lets "TIE THIS!" 1. Place hook in the vise and lay in the thread foundation base finishing at the bend 2. Starting at the bend tie in the single strand of flashabou returning the thread to the bend 3. Wax the thread and dub in Hares ear body material. You can use a simple touch/twist dubbing method or use a dubbing loop (tyers preference) 4. Wrap the dubbing forward building a tapered body. Ensure to leave enough space between the body and hook eye to tie in the hackle, herl head and allow room to whip finish. 5. Wrap the flashabou forward in 3-4 spiral wraps tying if off just in front of the body. 6. Prepare the hackle for a tip tie in 7. Tie in the hackle and wrap forward with 2-3 turns and tie off. 8. Tie in the peacock herl. 9. Spin-Twist the peacock herl and thread together for durability. 10. Wrap forward to build the head - it typically takes 4-5 wraps. 11. Tie off the herl and whip finish the head.
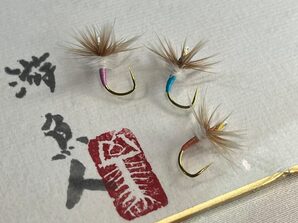
This month's TIE THIS fly is the Shetland Futsū as tied by Jason Klass. Jason has been a featured tier here in the past. I learned a lot about tying Shetland wool yarn from his posts on his blog TenkaraTalk.com. I think he covers it perfectly and I hope you will take some time at the vise to give this material and his fly a try. Here is his take and thinking about his work and use of the Shetland Futsū  The Shetland Futsū is a versatile fly that's great as an anchor fly, nymph, wet fly, emerger, or even dry fly (when treated). It allows you to instantly switch from an upstream dead-drift to a sasoi presentation without changing flies. I always tie mine with red thread, which acts as a "micro" hot spot -- just enough to entice without being overly blatant. It's cheap and easy to tie, which means they're easy to replace so you won't hesitate to throw your fly into that snag magnet everyone else is afraid to lose their $7 foam monstrosity to. But my favorite thing about this fly is its endless possibilities for experimenting with different color combinations. The Shetland wool comes in a wide range of colors, and all of them look intrinsically buggy, so you really can't pick a bad one! 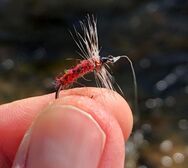
Gather your materials
Hook: Standard #14-#12 straight-shank wet Thread: Uni 8/0, red Body: Shetland Spindrift Yarn Hackle: Grizzly dry, one size smaller than hook size 
This last month in messing around at my fly bench I came up with what I think is a pretty good looking fly. I love this fly design enough to adopt it as my new "one fly" or "go to fly" for the next few years to come. The design is appealing to me and in the few times I have fished it, it seems to be appealing to the fish as well.
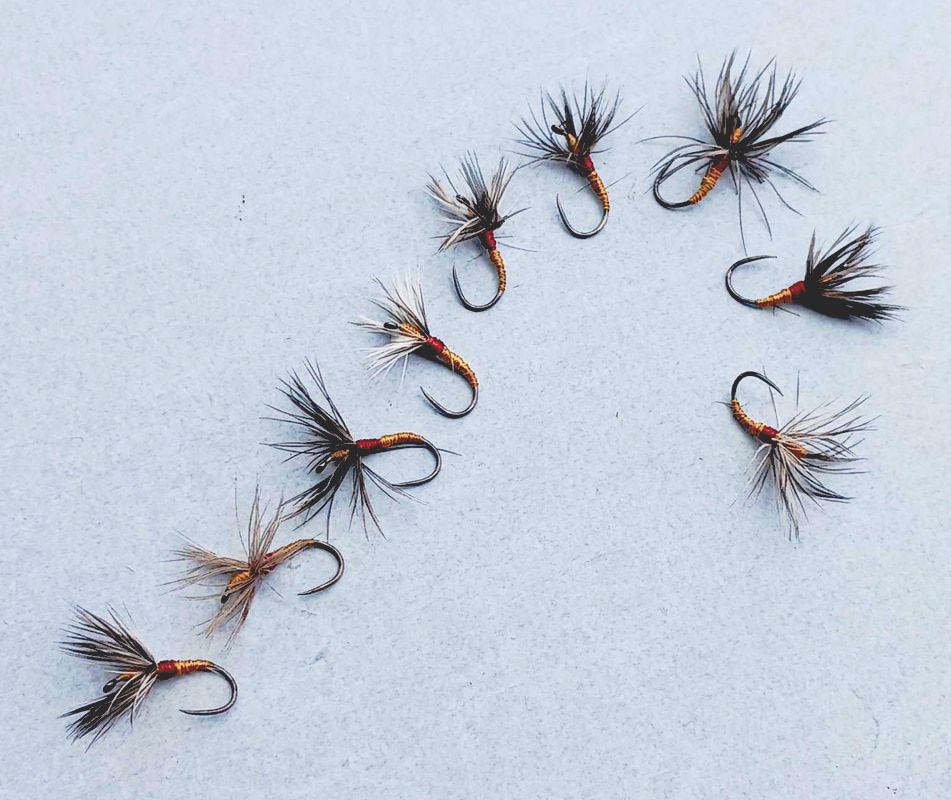
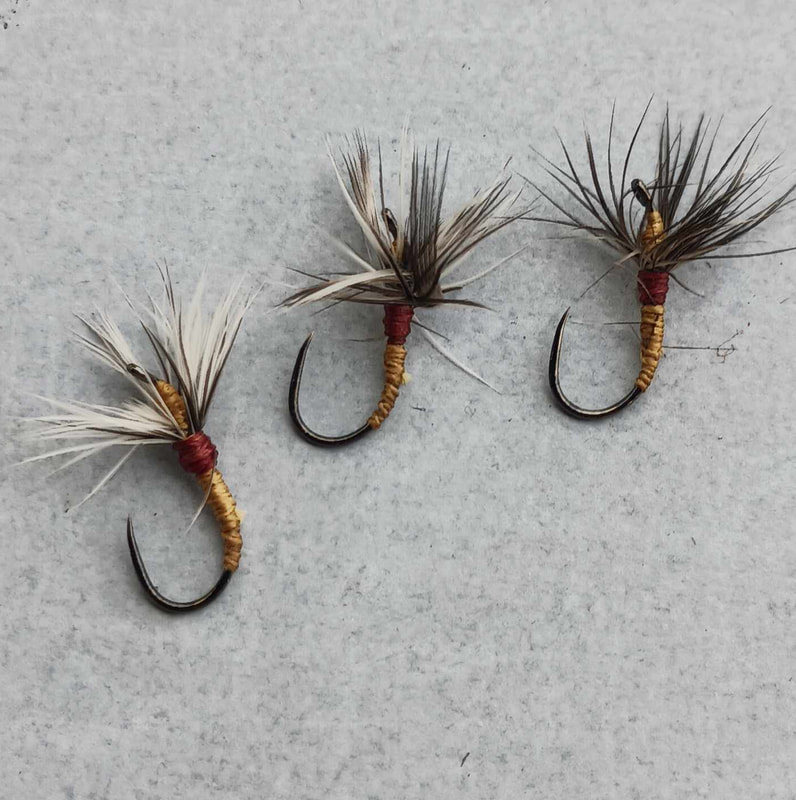
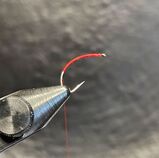
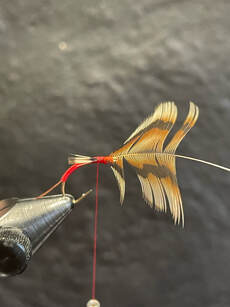
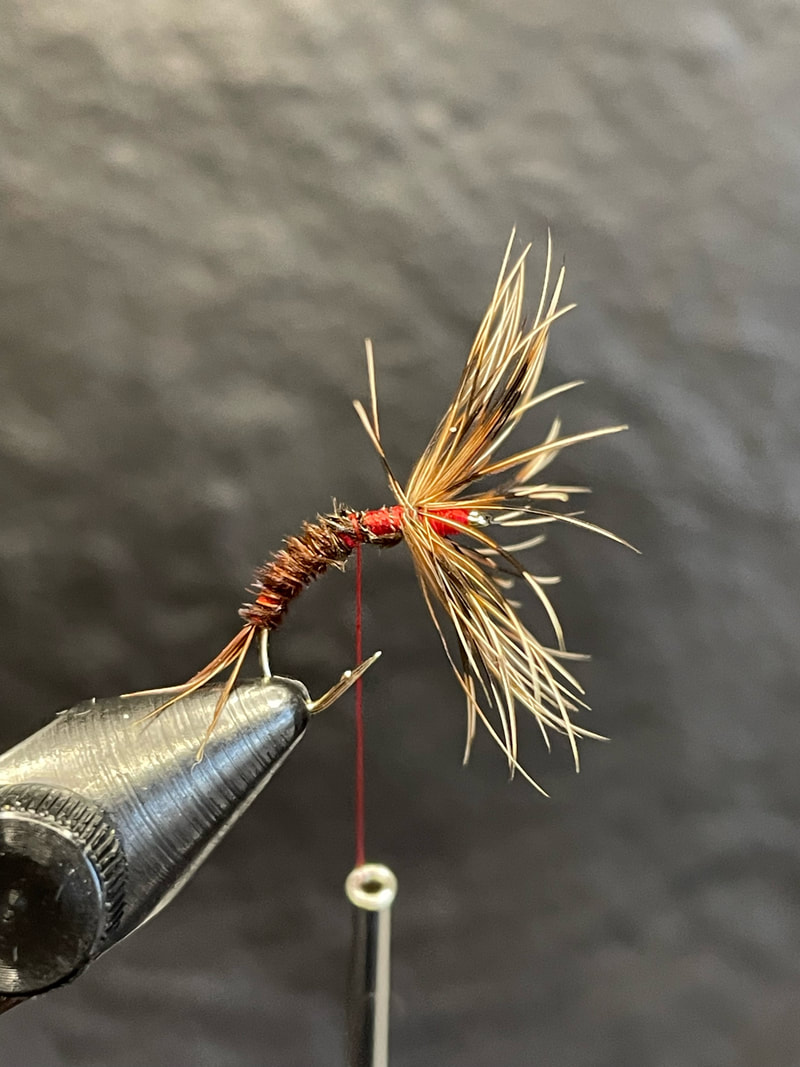
I am excited by the design for some esthetic reasons too. It just looks a little like an antique fly design. It is humble and yet practical with its splash of red thorax to catch the eye of the discerning trout. For a long time now I have experimented with using sharpie markers to dye thread while tying flies, resulting in a unique design. The fly I cam e up with was, named by Amanda Hoffner as "Matchstick Sakasa Kebari". Its desing resembles a matchstick with a red head and the hackles resembling sparks. MATERIALS Size 12 straight shank hook. Cotton sewing thread in tan, beige or my original choice of gold. Medium stiff grizzly hackle or mix it up with what you have on hand. Red Sharpie marker To tie the fly, follow these steps:
I will be offering these flies soon on my etsy store.
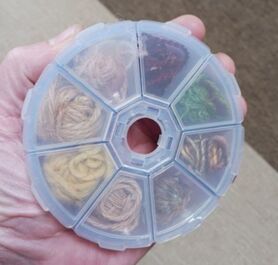
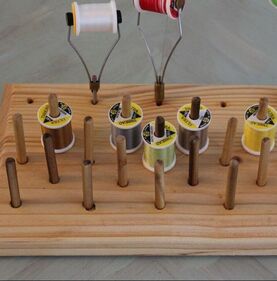
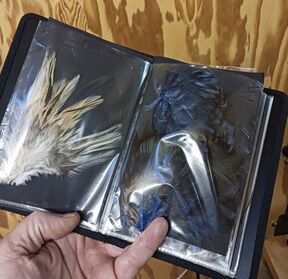
This month to put a twist in this month’s TIE THIS! Feature and instead talk about some basic tips on keeping your fly tying bench a little less cluttered. I am guilty about letting my tying station get cluttered up and becoming a crazy mess as much as the next person. But I hope to be better about it now. Let’s explore some essentials, and I will share some of my own tips and tricks to help you streamline your bench and create an efficient and enjoyable tying experience. 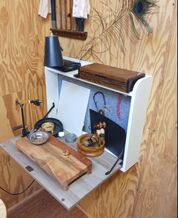 My fly tying bench is a folding table looking fairly clean and organized. My fly tying bench is a folding table looking fairly clean and organized. Create a Space For Creativity and NOT Work. I have found over the years that having a special dedicated space for my fly tying helps me focus, keep track of my materials and actually cultivates a place for me to be creative. This space does not have to be a separate room. It is nice however to have a place that you don't have to set up every time you want to tie flies. The point of dedicating a space for this is that you will have a place to keep your tools and materials. You can personalize your area and make it support your creativity. Let the space be a place you go to be creative and avoid looking at your space as a place you have to "work". I know some people tie flies as work.. but even then you should look at your work as a time to be creative and have fun. Never let your tying become a tedious activity. Add some pictures, maps, diagrams, books, or fly displays. Clutter is a sign that we are not slowing down to the moment. Roll top desks are nice but can be bulky and expensive. I have a fold away desk from IKEA that I use that works great. Organize Your Materials Efficient organization of your fly-tying materials is key to a well-managed bench. Consider using clear plastic containers, drawer dividers, or small tackle boxes to sort and store materials such as feathers, fur, threads, and beads. Label each container to easily locate specific items when needed. I have found pill boxes great for holding yarn, dubbing and hooks. I have also found folders with clear pockets for photos work great for holding feathers. By keeping your materials together you not only keep them organized you also know what you have and what you may need to replace or NOT buy more of on impulse when you see it. Seeing materials you have can also be inspiring to you

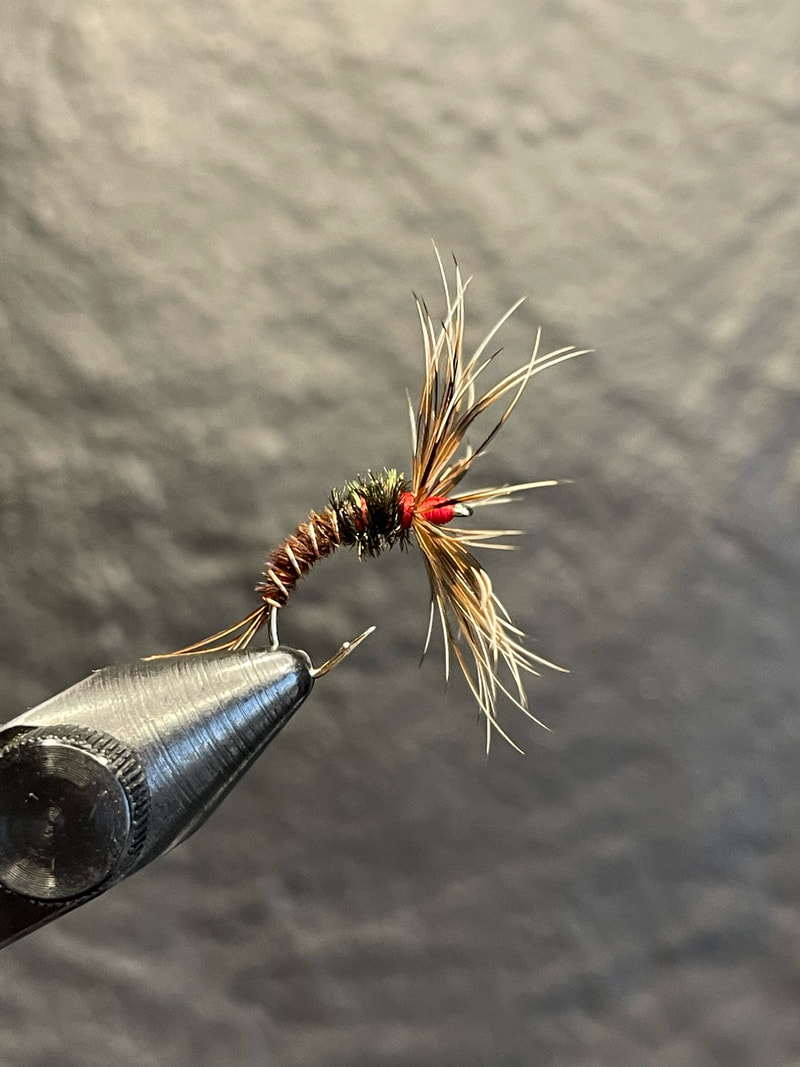
This month we have a really fun fly to tie. Don't be fooled by it's simplicity. If you are looking for a fly that gets scooped up like candy, then the Red Butt Kebari may become one of your top used flies in your "fleet of flies."..."swarm of flies?"..."flight of flies?" You know what Whatever you call it... you will want to add these to your arsenal.
Karel and I first met here in Colorado in the early days of tenkara. It was a sad day when his work sent him to live in London. But fortunately we have kept in touch and we have been able to plan fishing trips during a few summer trips he has made back to Colorado. Later this summer it will be my turn to go meet up with him. More about that later. On with the fly!
Red Butt Kebari
Karel Lansky "This one is a favorite from my time fishing in Colorado. Not quite an Ishigaki, not quite a Sakasa Kebari either. The Brahma hen hackle is somewhere in between stiffer cock hackle and soft hackles like partridge or pheasant. I tie this fly only in this color combination, a red butt and a black body." Gather up your supplies: 1. Hook: Daiichi 1157, size 14 (or any hook of your preference) 2. Thread: Red Pearsalls Silk, Black 6/0 no brand thread 3. Hackle: Brahma Hen Watch the video below!
We would love to hear if you tied this pattern and how it worked for you. Please share in the comments below.
Just last month Jason Klass posted the "Silk Road Kebari" on his blog TenkaraTalk. I cursed him affectionately under my breath when I saw what he had created. I was also working with some silk thread that had been given to me and was enjoying the process of trying to see what I could do with this elegant and slightly "boujee" material. He nailed what I think is a perfect design with a great nod to the traditions of Japanese kebari. These flies are wispy and colorful. You can easily imagine what they will look like in the water. But go ahead and dip the fly you tie in a glass of water to see how much the silk just shimmers and glows.
I was hesitant at first to post this fly design in our "TIE THIS" feature for March, being as Jason had only just posted it himself this last month. But hey, I think it really stood out as a one of the most interesting if not beautiful flies I have seen in a while. This page is all about sharing the best flies and how nice to get this one shared so quickly.
I have to say that this is NOT Jason's first great fly design that he has come up with. I have been inspired by his fly design posts and enjoyed his philosophy on fly tying. Jason has a way of seeing design in flies, pairing and balancing materials in a way that is not just attractive to hungry fish, but also creating flies that have an aesthetic appeal to the artist fly tier we all think we are (but know we have work to do still.) Perhaps it is his attention to detail or is that a troubling intensity of OCD that makes these flies so good? It is saying too little to say "the guy has chops!" I hope that you will enjoy 
Jason Klass
If you know anything about tenkara in the United States, then you know already that Jason is arguably the most prolific writer on the subject of tenkara in the world. His blog, has covered virtually every topic you can imagine. He has reviewed so many products and been a thought leader in the wave of bringing tenkara to the west. I just want him to finally publish a damned book. Rather than rehash and rewrite the text for his recipe for his "Silk Road Sakasa Kebari" I am just going to send you to his original post. But before I do I want to also say "thank you" to my friend for all you have done in supporting my work, encouraging me to write and for just being someone I can bounce ideas off of. Thanks too for the time we have shared hiking and fishing. I look forward to getting out again with you in the spring. Please be sure to send Jason a quick note of thanks if he has had an role in your enjoyment and education in tenkata. Either below in the comments here or on his blog in the comments below his post. You can also show him your support by visiting his new Etsy store too! 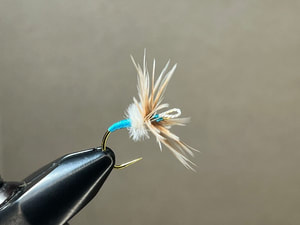
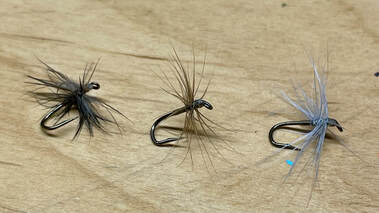
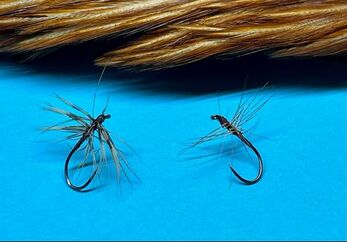 Left fly - hen pheasant / Right fly-Indian rooster cape Left fly - hen pheasant / Right fly-Indian rooster cape STEWART'S SPIDER Variation by Adam Rieger Hook: Size 12-14 standard shank Thread: Your choice of color Body: Thread Hackle: sparse hen pheasant or Indian rooster cape. (HISTORY WC Stewart's "The Practical Angler" was published in 1857. It was a landmark book for two major reasons. The first is that in it, Stewart strongly advocated to fish upstream. He was not the first to do that but the vast majority of fly fishing was done downstream and the vast majority of fly fishing books talked about techniques for fishing downstream. His advocacy for upstream fishing was groundbreaking and met with debate, but Stewart was such an exceptional angler that the technique he advocated, in his own hands, left few with much to argue about once seeing him in action. The second major reason this book was a landmark is because he classified the dressing of hooks (tying flies) into two categories - "spiders" and "flies". This first grouping he called spiders were his all purpose all the time "fly". More than anything, the spiders are more a technique to dress a hook rather than specific patterns. He did prescribe 3 specific patterns only one of which, the black spider, is something one can tie today - the other two include feathers from birds that are not legal to sell. (That said, nothing is stopping you from using any reasonable substitute for those feathers.)
|
TIE THIS!-Guest Fly Tyers Archives
February 2024
Categories |


 RSS Feed
Telephone(720) 371-9985
|
|